

One of the most common flavoring ingredients in kitchens all over the world, garlic’s pungent bulbs enhance almost any savory dish regardless of cuisine type.
While garlic is used as a herb or a spice, it’s actually a vegetable. This tasty allium comes from the amaryllis family, where fragrant cooking friends like onions, shallots, chives, and leeks also hail.
Garlic is such a staple in cooking that, in my opinion, it’s worth stocking up on and keeping some extra in the pantry, so you don’t find yourself going without it when you need it most. Stored properly, garlic can last a long time. Furthermore, garlic is relatively friendly to common preservation methods, which can help extend its shelf life.
Today we're going to look at how we can make garlic last longer, from how to select the freshest type to the different ways we can process and preserve garlic in its many forms. Let’s dive into how we can make the most of nature’s culinary gold!
Why Do We Want To Preserve Garlic?
What’s the hype around this funky little bulb, anyway? Well, it turns out garlic is much more than simply a flavor enhancer.
Garlic contains an amino acid called alliin that interacts with alliinase, which is the enzyme released during crushing or chopping. These compounds interact to create allicin, a natural substance that has been found to have antioxidant and inflammation-reducing properties.
Allicin is also anti-parasitic, anti-viral, and antifungal, packing garlic full of health benefits on top of its flavor-enhancing abilities.
In general, garlic cloves have up to 4.5 milligrams of allicin per gram of their fresh weight after crushing. Though do be aware that the longer your garlic is stored, the less allicin it has. Freshly chopped garlic loses its allicin rather quickly, so you’ll want to keep the cloves whole for as long as possible. That way, the preserved garlic retains its allicin levels and you get its full benefits along with its delicious taste.
Garlic is also relatively affordable, with a bulb costing less than one dollar. Or, it's free if you grow it yourself (which is fairly simple to do). All of these factors combine to make garlic the star of the kitchen, adding easy, versatile flavor to just about any dish you can think of.
What To Consider Before Preserving Garlic
Before we begin our preservation journey, let’s first consider our options with fresh garlic, as well as any risk factors that come with processing and preserving garlic.
Garlic Shelf Life
As a vegetable, garlic lasts a decent amount of time before it spoils. Be aware that it lasts the longest when kept whole—breaking the garlic bulb into individual cloves, peeling them, and cutting them up all reduce the amount of time you can keep garlic stored.
Fresh, whole garlic left on the counter lasts for close to six months from purchase date. Single, unpeeled, fresh garlic cloves last for a few weeks to up to a month. If your garlic is freshly chopped, it’ll last about a week at maximum in the fridge before its flavor and color start to change.
Fresh and whole garlic stored properly in the freezer can last up to a year (which we'll touch on later in the article). On the other hand, whole garlic heads kept in the fridge tend to sprout quickly, likely due to the humid environment.
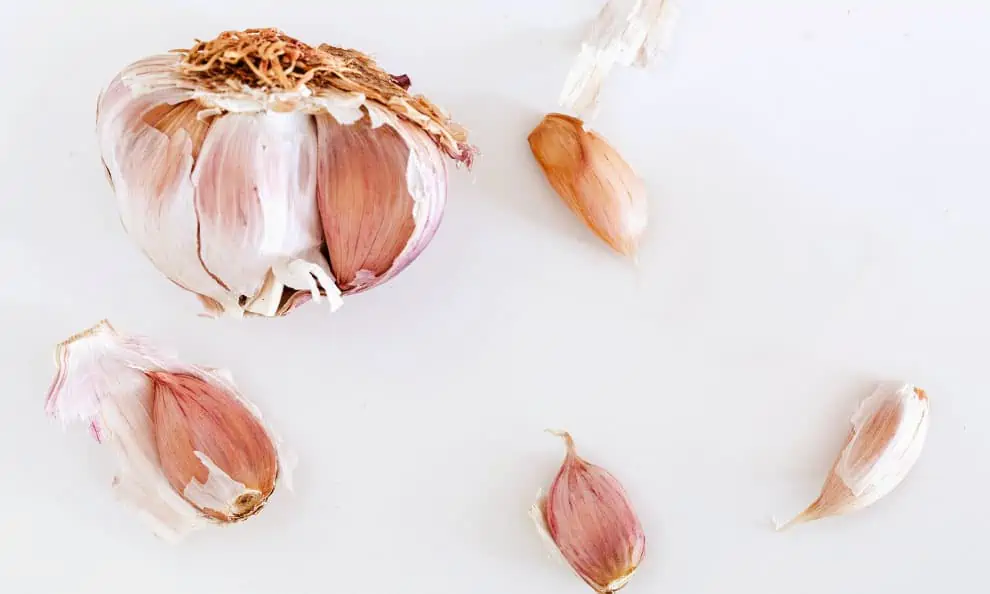
Selecting The Freshest Garlic
Choosing the freshest garlic bulbs prior to preserving will help you make sure your garlic lasts as long as possible. Here are 3 key ways to identify the freshest garlic.
How Does It Look?
First, take a look at the garlic. The papery skin should be clean and unbroken, with no signs of sprouting or mold. Garlic that is going bad will have cloves with brown spots and skin that has changed from white to yellowish-tan. If they have green roots in the middle of the clove, this means that the garlic has sprouted—you shouldn’t buy these as the new sprouts will be bitter.
How Does It Smell?
Garlic has a distinct scent—anyone taking a sniff of garlic will very likely be able to identify exactly what it is due to its unmistakable spicy and pungent, yet mellow smell. If it smells sour or if it doesn’t exactly smell like garlic you've smelled before, it’s probably gone bad and you should get rid of it.
However, garlic should not smell too strong as the scent only really comes out once the clove is cut into or cooked. If they smell particularly strong, the skin might have split or something else might have happened to the garlic, and they’re probably not good for cooking.
How Does It Feel?
Healthy garlic bulbs should feel heavy for their size, with complete, whole cloves. When squeezed or touched, they should feel firm and crisp. If they feel soft or mushy, it's highly likely that they're spoiled and should be thrown away.
Now that you’ve picked garlic bulbs that look good, smell good, and feel good, you can embrace the garlic breath life without worry.
Storing Fresh Garlic
Fresh garlic should be kept in a container that lets air circulate, like a paper bag, a mesh bag, a paper-type egg carton, or a wire-mesh basket. Good ventilation helps prevent moisture build-up, which in turn stops mold from growing.
Keep garlic bulbs on their own, because that prevents mold spore transmission from other produce.
It’s also important to keep garlic in a cool, dry area to prevent mold and rot. In bright places and at temperatures beyond 60°F, your garlic has a higher chance of growing mold, rotting, and sprouting. Obviously, moldy garlic cannot be eaten, but garlic that has sprouted will become bitter because of the green bits in the center.
Sprouted garlic can still be eaten if the green sprout is removed, but do you really want to risk biting into some bitter stuff when you’re just trying to enjoy your food? Keep the sprouts for planting if you are so inclined, so you can have a steady supply of garlic at home.
Last, as mentioned above, do not place whole heads of garlic in your refrigerator as this environment causes garlic to sprout much quicker than normal. This is likely due to the fact that garlic is usually planted in the fall season and its roots develop in the winter, when it's colder. The cold environment of the refrigerator simulates the cooler weather, likely pushing garlic to sprout.
Botulism Risk
Low-acid vegetables like garlic stored in oil at room temperature stand the risk of growing dangerous bacteria that causes botulism, a form of food poisoning that can be fatal.
Garlic pH levels range from 5.3 to 6.3, which supports the growth of the bacterium clostridium botulinum. This bacteria comes from the soil in the form of inactive spores—you usually don’t have to worry about this if you’re eating your garlic fresh.
However, these inactive spores come to life and thrive in low oxygen, moist, room temperature conditions. In large quantities, they produce a tasteless, unnoticeable toxin that causes the following symptoms:
- Breathing problems
- Blurred vision
- Difficulty swallowing
- Muscle weakness
- Double vision
- Drooping eyelids
- Slurred speech
- Difficulty moving the eyes
How do we prevent getting botulism? If you’re keeping raw garlic in olive oil, you have to store it in the refrigerator and use it within 4 days. Garlic in oil can be safely stored in the freezer for up to four months, but if your garlic oil mixture has been hanging out at room temperature for more than 2, it’s best to be safe and throw it away.
Garlic Turning Blue
Sometimes, garlic turns blue or green. This happens because the sulfur that makes garlic smell pungent interacts with garlic enzymes as they break down, changing the color of stored garlic. This doesn’t affect the flavor or potency of your stored garlic, and it is still safe to eat despite its new color.
To prevent this, use stainless steel cookware, distilled water, and iodine-free salt when you process and preserve garlic—while it may not completely stop your garlic from turning blue, it should still reduce the chances of it happening.
How To Process & Preserve Garlic
Now that the heavy lifting of picking out the right garlic and storing garlic safely is out of the way, we can finally get to the meat of the topic; how to actually process and preserve garlic correctly! Below we’ll cover the step-by-step process of garlic preservation in its many forms.
Garlic can be preserved in many forms, among them being:
- Whole, unpeeled garlic by the bulb
- Unpeeled individual garlic cloves
- Peeled individual garlic cloves
- Crushed garlic
- Minced garlic
- Garlic paste
It can also be preserved using a few different methods, including:
- Frozen garlic
- Refrigerated garlic
- Roasted garlic
- Dehydrated garlic
- Pickled garlic
- Garlic in oil
We’ll go through these methods one by one, but before that, let’s talk about how to properly process garlic for consumption.
Processing Garlic
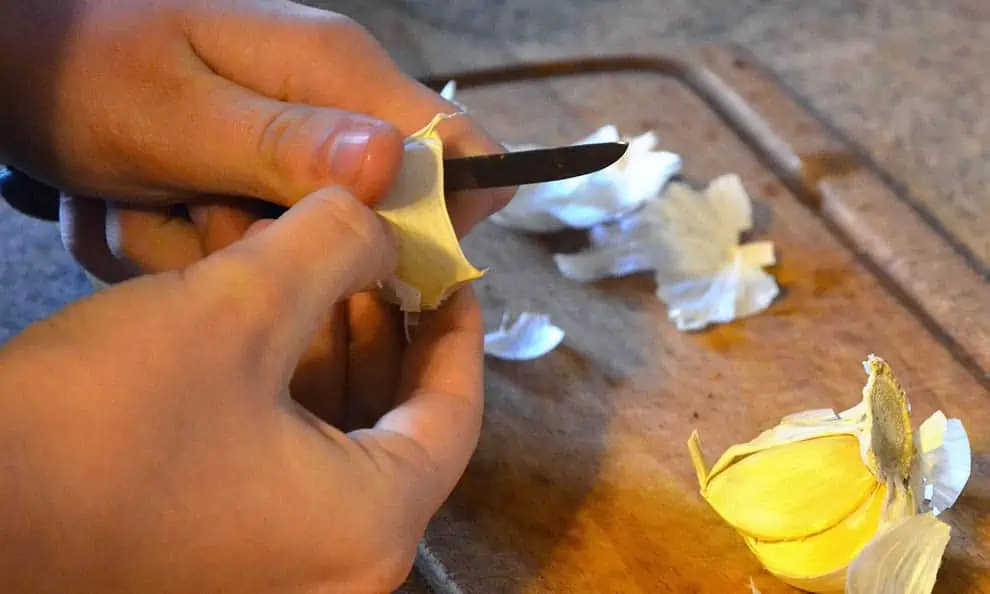
Step 1: Peeling & Preparing
To begin processing your garlic, break the cloves apart using your hands. Garlic cloves can be peeled by hand, by using a peeler tube (this is the one we use), or by shaking them inside a container until the peel comes off. The papery garlic skin leftover can be kept for use in cooking stock—just add it to your stockpot and make sure to remove it after the stock is done as it isn’t edible.
Now that the garlic cloves have been peeled, check each clove for green sprouts, brown stems, or bits that don’t look like they should be eaten. Remove all of these with a paring knife before preserving them so that they don’t affect the flavor and texture of your prepared garlic.
Step 2: Processing Using A Food Processor
The prepared garlic cloves can be processed further if you like to keep ready-to-use garlic on hand. Chopping up a large batch of garlic by hand can be an exhausting process that takes all day, so we recommend using a food processor to get a nice, even texture with less effort. They can be a bit expensive but there's no need to go overboard on one. We use this fairly inexpensive Cuisinart for processing garlic and works well.
It's best to use short pulses to process the garlic until you reach your desired minced garlic consistency, or press and hold until the garlic turns into a paste. Remember to pause and scrape down the sides of the food processor from time to time so that the garlic is processed evenly.
Step 2 (alternate): Processing By Hand Using A Knife
If you don’t have a food processor, you can still make garlic paste by hand with a very sharp knife—add coarse, flaked salt to the garlic, as it helps to soften and break it down, speeding up the paste making process.
For chopping and mincing garlic by hand, first use the flat of your knife blade to crush the clove against the chopping board using the palm of your hand. Next, slice the garlic finely—you should get thin slices about the thickness of a potato chip. Thicker is alright, as you’ll be laying these slices flat to slice them again, this time into thin strips.
Once that’s done, chop the garlic in different directions using a rocking motion with your knife, with one hand holding the handle and the other hand keeping the tip steady. Chop until you’re satisfied with the consistency of the minced garlic.
Now that your garlic is processed to your liking, let’s take a look at the ways it can be preserved.
Preserving Garlic
Frozen Garlic
Shelf Life: Three months if raw, up to a year if cooked.
Keeping raw garlic in the freezer will help garlic retain allicin, the substance that earns garlic its superfood status. Since allicin degrades over time, as mentioned above, it’s important to freeze garlic as soon as you can so you can get the most nutritional benefits from your preserved garlic.
You can keep your garlic as whole, unpeeled bulbs, or you can peel them and keep them as whole cloves. You can also chop or crush garlic before freezing it—what’s important is the way the garlic is stored.
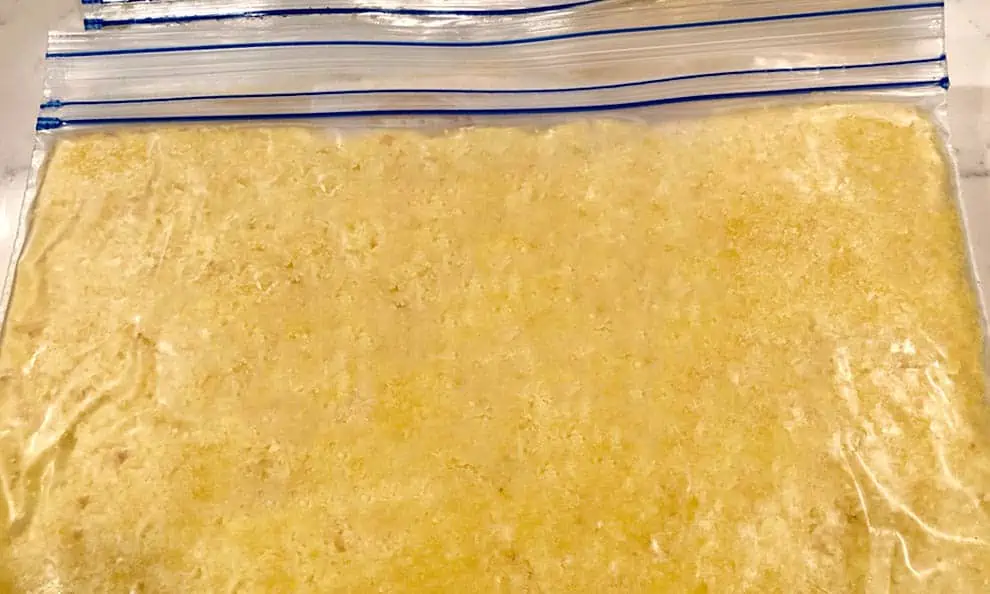
Before freezing, tightly wrap the garlic in plastic freezer wrap or aluminum foil. You can also do what we do and put the garlic into an airtight container or freezer bag. We use these reusable bags specifically because they're airtight and thicker than simple Ziplock bags. Doing so has helped us eliminate freezer burn, plus because we can use them over and over and, it's more economical than single-use plastic bags or aluminum foil.
If you’re using freezer-safe storage bags to store processed garlic, you have the option of using the blunt side of a knife to partition the garlic into one-inch squares, which come out to around one teaspoon of garlic per square.
As an alternative, consider putting garlic into ice cube trays (if they’re in paste form). After dividing the garlic, put the entire tray into a freezer-safe storage bag so you can just pop the cubes of garlic out for use in cooking later. We're basically mimicking the Doroto Gardens brand frozen garlic you've likely seen at your local grocery store.
Adding salt or oil is optional when it comes to freezing garlic as it changes the taste, but oil can make it easier to cook, while salt can add dimension to the garlic flavor. For every four to five cups of peeled garlic cloves, add up to half a cup of oil and up to a teaspoon of salt.
Frozen garlic doesn’t have to be thawed before using—all you have to do is take the portion you need from the freezer and drop it into the pot or pan. It won’t have the same texture as fresh garlic, but it keeps its flavor well. Use it in recipes where garlic texture isn’t as important.
Refrigerated Garlic
Shelf Life: Three days to three weeks depending on storage method.
Garlic can also be stored in the fridge, but it really depends on how you do it.
It’s not a great idea to store unpeeled whole heads of garlic in the fridge as the humid, cool environment encourages sprouting. However, if you have some leftover processed garlic, or if you want to prepare your garlic for cooking ahead of time, you can still keep it refrigerated in an airtight container for a short while.
Peeled garlic cloves last about a week in the fridge—if your garlic is chopped, minced, or made into a paste, it will only last a day or two before the flavor and the texture both start to decline.
You can make garlic last longer in the fridge by storing it in olive oil. Use a clean, dry container to soak the garlic, and make sure that it is completely covered by oil, with no parts exposed to the air. Stored this way, it’ll last for up to three weeks, after which you should toss it.
If you’re storing garlic in oil in the fridge, remember to refrigerate it immediately after the garlic has started soaking in the oil. Garlic in oil kept at room temperature for more than two hours promotes the growth of bacteria that emit neurotoxins. These neurotoxins cause botulism, a potentially fatal condition that affects the nervous system.
Roasted Garlic
Shelf Life: One week in the refrigerator, up to three months in the freezer.
Once roasted, garlic takes on a delicious, buttery quality—you can use roasted garlic like you would fresh garlic, or you can eat it on its own as a topping on toast or crackers. You can also mash roasted garlic into salad dressings and spreads like hummus to add flavor.
To roast garlic:
- Preheat the oven to 400°F.
- While the oven is going, trim off and discard one inch from the top of the whole head of garlic. Peel off most of the papery skin, but leave the cloves connected with the head still intact.
- Set the garlic head on a piece of foil and drizzle over with olive oil. Season with salt and pepper to taste.
- Wrap the garlic tightly with the piece of aluminum foil from the previous step and place them on a baking dish.
- Roast the garlic for 40 to 60 minutes. How quickly it cooks will depend on factors like the size of garlic, the amount being roasted, the variety of garlic being used, and the age of the garlic. You can start checking the garlic by poking it with a paring knife after 40 minutes, in 10-minute intervals—it is done when the center clove is soft, but you can continue roasting it if you like a more caramelized flavor.
- Let the garlic cool once it’s cooked. To serve, press on the bottom of a garlic clove to push it out of its skin. If you’re storing it, squeeze the garlic out of their skins into an airtight container before keeping it.
If you prefer, you can also separate the garlic into individual cloves before roasting. This helps the garlic cook faster—put the cloves into a foil packet, season and oil as usual, and bake until soft.
Roasted garlic lasts for up to two weeks in the refrigerator or up to three months in the freezer. Unlike fresh garlic, this cooked garlic does not freeze into solid chunks, so you can easily scoop it out for use.
Dehydrated Garlic
Shelf Life: Up to three years.
Like many fragrant vegetables, garlic dehydrates well and still retains its pungent flavor. It can be dried the old-fashioned way by hanging it up, or you can use an oven, dehydrator, or even an air fryer to speed up the process.
After the garlic is dried, you can toss it into a food processor to make garlic powder, which can then be mixed with salt to make garlic salt. Dehydrated garlic lasts up to three years before it starts to lose its flavor potency.
To cure your garlic by hang drying it:
- Tie your harvested garlic plants in bunches to hang them, or spread them out on a rack. Keep them in a cool, dry place with good ventilation.
- Let the garlic dry for a few weeks. Garlic with larger cloves will need more time to cure. When the garlic is ready and completely cured, the outer layer of skin will feel shrunken and more papery than usual.
- Trim the roots to about a half-inch away from the bulb, and gently brush the bulb to remove any excess dirt. You can remove the outermost layer of the garlic skin if you want it to be cleaner, but don’t remove more than that as your garlic needs the protection to last a long time.
- If you’re braiding your garlic, leave the stalks intact. Otherwise, if you’re storing the garlic loose, trim the stalks to about an inch or two in length. Dried like this, garlic can stay fresh for months.
Here's a great video tutorial on how to dehydrate garlic by hang drying.
To dehydrate your garlic using an electric food dehydrator or an oven:
- Peel the garlic and cut the cloves in half lengthwise. As usual, discard any cloves that are bruised, damaged, or otherwise not fit to be eaten.
- Follow the manufacturer’s instructions for drying if you are using a dehydrator. This varies according to brand.
- If you are using an oven, preheat the oven to 140°F. Spread the garlic pieces out on a baking dish and bake them for two hours. After that, continue baking at 130°F for four to six hours, or until the garlic is thoroughly dry. The garlic will be brittle and crisp after it is completely dried, and when the pieces are snapped in half, they will break cleanly.
- Let the garlic cool and store it in a clean, dry, airtight container at room temperature, or put it into the food processor to turn it into fine powder. This garlic powder can be used on its own, or it can be made into garlic salt - mix according to a ratio of three tablespoons of sea salt to one tablespoon of garlic.
Here's a good video tutorial on how to dehydrate garlic using an electric food dehydrator and here's another on how to do it in the oven.
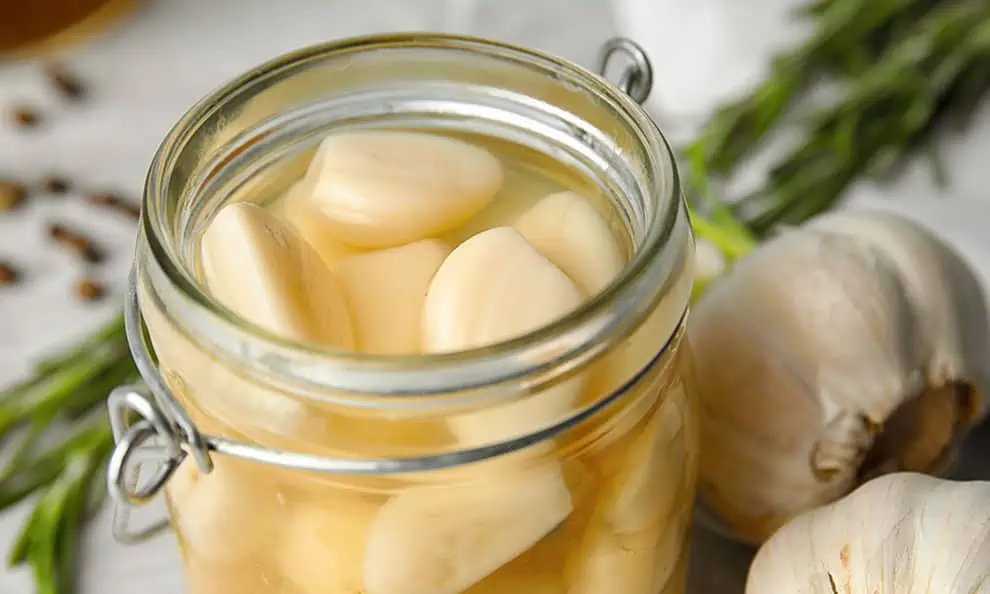
Pickled Garlic
Shelf Life: Up to four months at room temperature, up to a year if stored in the refrigerator.
Pickled garlic lasts about four months at room temperature, but in the refrigerator, it can last a year. If you are pickling large amounts of garlic, we suggest dividing it into several smaller containers instead of using one large container for everything—that way, if one container is contaminated, the whole batch isn’t ruined. This has happened to us in the past and it was a major disappointment. Learn from our mistakes!
To pickle garlic:
- Fill a heat-safe container with peeled garlic cloves or chopped garlic. Make sure not to pack it too tightly, as the garlic will need some room to soak thoroughly.
- Add enough red or white wine vinegar to fully submerge the garlic, leaving none exposed to the air. You can boil the vinegar before adding it to the garlic so that the flavors meld better, but it might briefly cook your garlic and make it lose some of its crunch.
- Add one tablespoon of sea salt per cup of vinegar. If you’d like, you can also add dried herbs like bay leaves and red pepper flakes for extra flavor.
- Cover the container with a tight-fitting lid and shake so that the salt and herbs are well distributed.
- Store the pickled garlic in the refrigerator, or keep it in a cool, dry place if you are leaving it at room temperature.
Here's a great video tutorial explaining how to properly pickle garlic.
You don’t have to throw out the garlic-infused vinegar and salt mixture once you’re done using up the pickled garlic. I've found it to be a great substitute for regular cooking vinegar, if you're looking to give your dish extra flavor. Mix it with olive oil to make salad dressing, or use it to marinate meat, poultry, or fish for a special garlicky kick to your food.
Similar to storing garlic in vinegar, you can also store garlic in red or white wine. It works just like storing garlic in vinegar, but you'll want to omit the part where the liquid is heated, as that will cook off the alcohol present in wine.
Garlic In Oil
Shelf Life: One week to a year depending on cooking and storage methods.
Storing raw garlic in oil at room temperature sets us up for some hazardous conditions. This is because garlic is a low acid vegetable and oil provides a low oxygen environment, these factors combined make for the development of botulism toxins in the garlic, which can be fatal in high doses.
That being said, it’s not the end of the line for keeping garlic in oil—we can avoid this situation by either cooking the garlic beforehand or by keeping the garlic and oil mixture at temperatures where the toxin-creating bacteria won’t grow.
To preserve garlic in oil at home with cooked garlic:
- Put dehydrated garlic or roasted garlic into a jar and top it with olive oil. The oil should cover the garlic completely, with no exposure of garlic to air.
- Screw on the lid tightly and keep the jar in the refrigerator. The olive oil will become solid in low temperatures, so use a spoon to take the garlic out of the jar. Make sure to use a dry spoon, as introducing moisture to the garlic and oil mixture will contaminate it.
- You can also freeze cooked garlic in oil—make sure to use a freezer-safe container, as jars made of glass will crack at extreme temperatures. Roasted garlic in oil lasts for about a week in the refrigerator, while dehydrated garlic in oil lasts up to a month. If you put cooked garlic in oil in the freezer, it’ll last up to a year.
To preserve fresh garlic in oil by freezing:
- Put peeled garlic cloves into an ice cube tray. You can also process your garlic and make it into sliced garlic, minced garlic, or garlic paste—whatever works best for your cooking needs.
- Fill the ice cube tray with olive oil so that the garlic is covered and saturated with the oil. After that, you can put the garlic and oil mixture into the freezer.
- Once the garlic in oil cubes are fully frozen, you can pop them out of the ice cube tray into a different container. This frees up the ice cube tray for more garlic oil cubes as well as creates more freezer space. You can also try freezing herbs in oil.
- Frozen fresh garlic in oil lasts three months until it loses some flavor, but you can keep it up to a year.
Besides just storing plain garlic in oil, you can also make garlic confit and garlic butter.
To make garlic confit:
- Put peeled garlic cloves in a small saucepan and cover them with olive oil.
- Turn the stove to a very low heat—this will be the lowest setting possible on your stove. Small bubbles will start to form as the oil begins to warm.
- Let the oil heat to a simmer. The bubbles in the oil will gradually increase in size.
- Cook the garlic in the oil over very low heat for the next 15 to 30 minutes, or until the cloves are tender and cooked through. Stir carefully every few minutes to prevent burning. The garlic cloves should still keep their shape, but if you pierce the cloves with a long sharp knife or with a fork, there should be little to no resistance.
- Take the garlic and oil off the heat and transfer the mixture to a clean heat-safe jar. If you like, you can add fresh herbs to the oil for extra flavor.
- Cover the jar with a tight-fitting lid and refrigerate immediately. The garlic confit you made should last a month in the fridge, but if you freeze it, it’ll last up to a year. Remember to use a freezer-safe and heat-safe container if you are freezing your garlic confit.
To make garlic butter:
- Crush, mince or blend peeled garlic cloves depending on your preferred garlic butter consistency.
- Mash the garlic into salted butter according to a 1:1 ratio. You can change this ratio if you like. Add finely chopped parsley for extra flavor, or leave the garlic butter as is.
- Scoop the garlic butter into an ice cube tray or store it in a freezer safe container before freezing. This mixture will last for two weeks in the refrigerator, and up to six months if frozen.
Garlic in olive oil has the chance of going bad or rancid if it’s been contaminated. Use the look, smell, and feel test we went over above to figure out whether your garlic is still safe to eat. It’s not fit for consumption if:
- The oil smells sweet, similar to Elmer’s glue.
- The garlic smells sour.
- The garlic has brown or yellow spots.
- The olive oil is bubbling.
In short, if anything about the mixture looks, smells, or feels off, it’s safer to just throw it out.
The oil used to preserve garlic will keep its garlicky flavor, so you don’t have to throw it out once you’re done. Like garlic-infused vinegar, garlic-infused oil can be used in cooking—you can substitute regular cooking oil with garlic oil, or use it as a garnish or flavoring agent.
Final Thoughts
Whew! We’re at the end of our guide on how to preserve garlic. With plenty of things to consider like garlic’s shelf life, how to select great garlic and best practices for storage, we’re all set on our mission to process and preserve this versatile little bulb.
For further information on how to preserve garlic, I highly suggest reading this PDF from University of California. It has a substantial amount of information on the process of preserving garlic as well as how to do it safely.
Have a question about preserving garlic that we didn't cover? Let us know in the comments below and we'll respond as soon as possible!


