

Cooking can be a joy or a chore, depending on how you approach it.
While some may love spending hours in the kitchen, others prefer to whip up a meal quickly and move on with their day. Regardless of your approach, everyone can benefit from a few cooking hacks that can make your time in the kitchen more efficient and enjoyable.
However, it's important to note that shortcuts don't always lead to better results. While it may be tempting to rush through a recipe, taking the time to properly prepare ingredients and cook them to perfection can make all the difference.
With that in mind, I've compiled 19 cooking hacks that prioritize efficiency without sacrificing quality. These tips will help you save time, reduce waste, and simplify the cooking process, so you can spend more time enjoying the fruits of your labor.
Test your oven for hot spots.

Following a recipe for cooking temperature doesn’t do you much good if your oven isn’t properly calibrated. To test your oven, hang an oven thermometer from the center of the middle rack and preheat the oven to 350°F. Give the oven at least 20 minutes then check the thermometer to see whether it has reached the desired temperature.
Even if your oven gets up to the right temperature eventually, it might not heat evenly. Hot spots can lead to over- or undercooking, depending on where you place the pan. Identifying hot spots enables you to know where to position food to make sure it cooks evenly. The solution might even be as simple as rotating your pans throughout the cooking process.
To test for hot spots, preheat your oven to 400°F. Place a piece of parchment paper on a large baking sheet and place it on the middle rack for 20 minutes. The heat will darken the paper the longer it remains in the oven. If certain parts of the paper darken more than others, you’ll know you have hot spots.
Achieve perfectly crumbly pastry with grated butter.
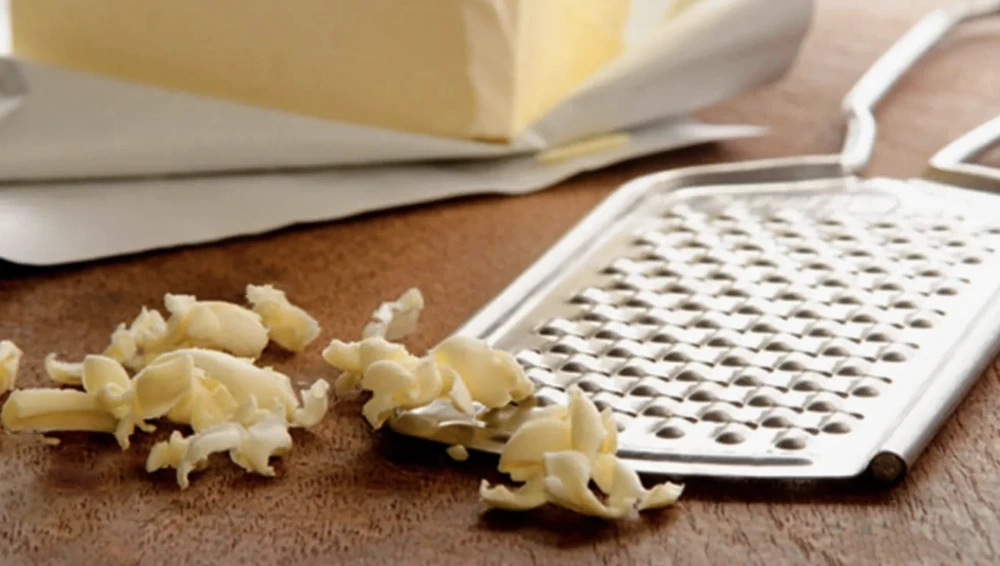
Baking requires a certain degree of finesse which, unfortunately, often correlates to time. If you love homemade baked goods but find the preparation process tedious, this hack could change everything: freeze and grate your butter.
For any recipe that requires you to cut butter into flour, grated butter is the way to go. Simply freeze the required amount of butter ahead of time then grate it using a standard cheese grater (this is the one I use).
From there, you just have to stir it into the flour mixture instead of spending ten minutes working it in with a pastry cutter or fork. Your pies and pastries will never be the same!
Freeze fresh herbs in ice cube trays.
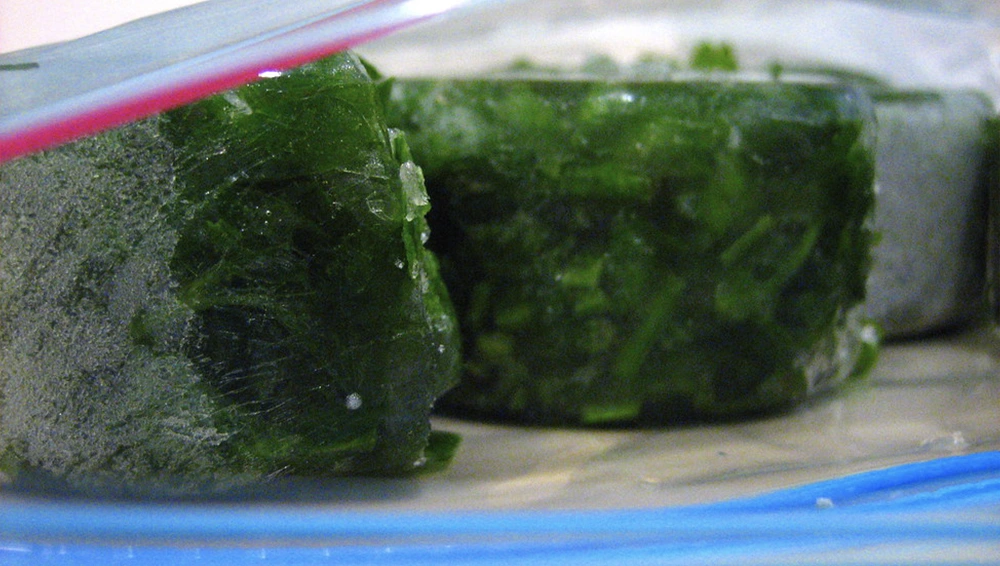
Have you ever found yourself wondering what to do with leftover herbs after preparing a recipe? Rather than letting them go to waste or taking up valuable counter space to dry them, throw them in the freezer.
The trick to keep the herbs from dehydrating is to put them in ice cube trays with a little water or oil. This is the perfect way to preserve the herbs from your summer garden so you can enjoy that fresh flavor all year-round.
I like to use bigger than normal ice trays, like this one, since it allows me to store larger quantities of herbs in each cube. When I'm ready to use the herbs, I simply pop out a cube and add it directly to my cooking. This method works well with herbs like rosemary, thyme, and sage, but can also be used for softer herbs like basil and parsley.
Not only does freezing herbs help reduce food waste, but it also saves money on buying fresh herbs from the store every time you need them. Give this hack a try and never let those leftover herbs go to waste again.
Make popsicles from overripe fruit.
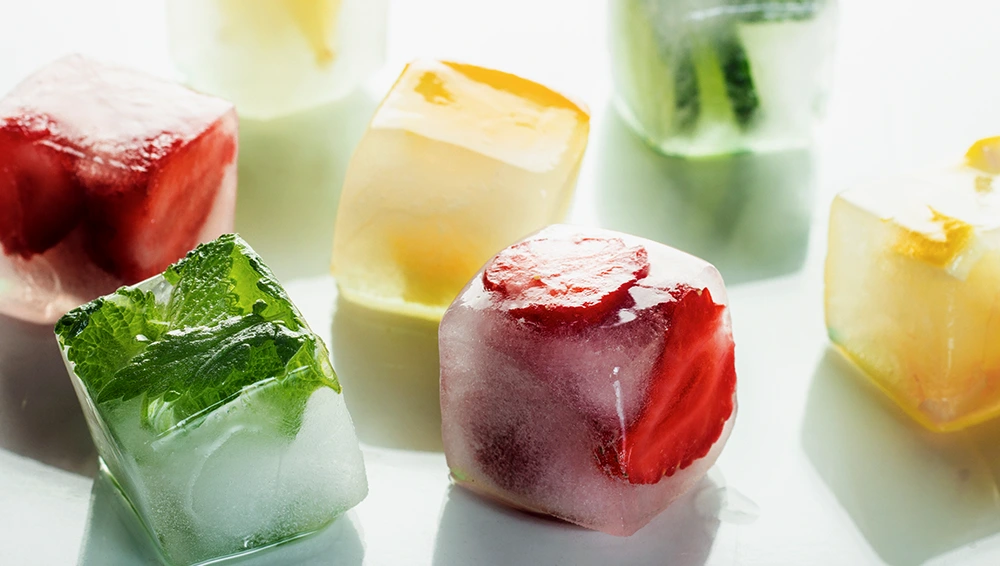
When it comes to reducing food waste in the kitchen, fruit is another common culprit. Whether it's bananas turning brown or a surplus of berries that are about to go bad, it can be frustrating to watch perfectly good fruit go to waste. Fortunately, your freezer can once again come to the rescue!
One important thing to keep in mind is that not all fruit is created equal when it comes to freezing. While bananas are a great candidate for freezing, other fruits like oranges don't fare as well due to their high water content. Freezing these fruits can cause them to become mushy and lose their texture.
However, that doesn't mean you should give up on freezing fruit altogether! One great option is to blend overripe fruit into a puree and freeze it into convenient cubes or popsicles. To do this, simply cut out any inedible portions of the fruit (like stems or seeds), chop it up into smaller pieces, and puree it in a blender or food processor until it's smooth.
From there, you can pour the puree into ice cube trays and freeze until solid. These fruit cubes can be used in smoothies, added to sparkling water for a fruity twist, or even used as a base for homemade sorbet. Alternatively, you can pour the puree into popsicle molds and freeze for a delicious and refreshing treat on a hot day.
By freezing overripe fruit instead of letting it go to waste, you not only save money and reduce food waste, but you also have a ready supply of sweet and nutritious ingredients on hand whenever you need them.
So don't throw out that overripe fruit just yet—freeze it instead and enjoy the fruits of your labor all year round!
Soak inexpensive fish in milk.

While fresh fish should ideally have a mild aroma and flavor, some types of fish can have a stronger and more distinct "fishy" taste that can be off-putting to some people.
Luckily, there is a simple hack that can help to counteract this issue and make your fish more palatable—soaking it in milk! The lactic acid in milk helps to neutralize the strong flavors in fish and also helps to tenderize the meat, resulting in a more succulent and flavorful final product.
To use this cooking hack, simply arrange the fish fillets in a baking dish and cover them with milk. You can technically use any type of milk you like, but I find whole milk or cream tends to work best since it has a higher fat content. Let the fish soak in the milk for at least 2 hours in the refrigerator before cooking as desired.
This hack is particularly useful for inexpensive types of fish like sole, which can have a stronger flavor and odor compared to more expensive varieties. Soaking it in milk before cooking helps to bring out its natural sweetness and can make it the perfect ingredient for dishes like fish tacos.
Save butter wrappers to grease baking pans.
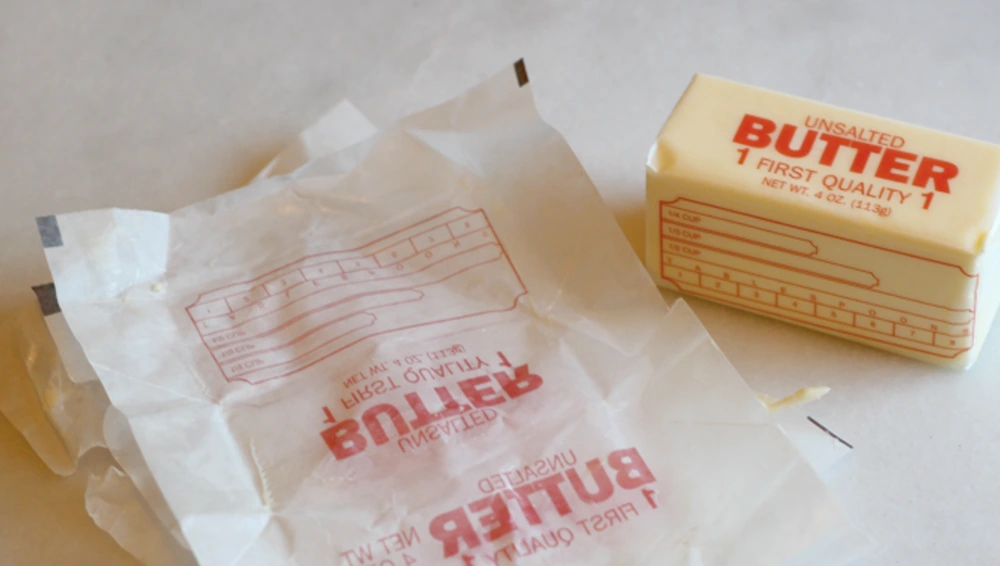
When it comes to baking, one of the most important steps is to prepare your pans properly to prevent sticking and ensure even baking. While cooking spray can be a convenient option for greasing pans, sometimes it doesn't provide enough coverage or leaves a residue that affects the taste of your baked goods.
Using butter or shortening to grease your pans is a traditional method that has been used for generations. However, this can be a messy and time-consuming process, as you need to use your fingers or a pastry brush to spread the butter or shortening evenly across the pan.
I found a clever hack to make greasing baking pans easier and less messy is to use the paper wrapper from a stick of butter.
After you've used up the butter, there's usually some leftover butter residue on the paper wrapper that can be used to grease your pans. By saving these wrappers in a zippered plastic bag in the fridge, you can have a ready supply of buttery wrappers whenever you need them.
To use the butter wrapper method, simply take a wrapper out of the bag and wipe it across the surface of your baking pan. The residual butter on the paper will provide a thin and even layer of grease, helping your baked goods release from the pan easily and without sticking. Plus, using a paper wrapper is less messy than using your fingers or a brush, making cleanup a breeze.
This hack is a great way to save time and reduce waste in the kitchen, as you can use up every last bit of butter and avoid throwing away greasy paper wrappers.
Pre-portion ground meats for easy burger prep.
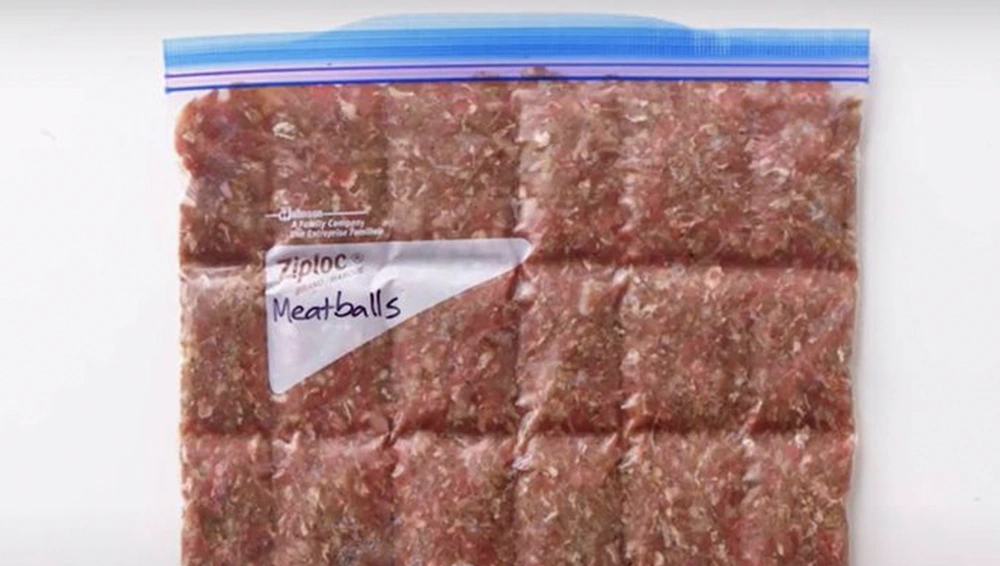
Buying ground meat in bulk can be a cost-effective way to save money, but it can be challenging to store a large amount of meat in your fridge or freezer. To make the most of your storage space, I find it's best to divide the meat into portions and store them in resealable freezer bags.
To really make the most of your freezer space, I find it helpful to make the meat as flat as possible before freezing (so it looks like this).
This technique helps the bags become stackable and takes up less space. Moreover, when you roll the meat thin, I found that it defrosts much faster, which is convenient when you're in a hurry.
If you want to take the portioning process even further, you can use a chopstick to score the meat in the freezer bag. This method helps you separate the ground meat into nine even portions, which can be useful if you're planning to use it for burgers or other dishes that require a specific amount of meat.
Once the meat is scored, you can break off individual portions as needed. When you're ready to cook, take out the bag of frozen meat and remove the desired number of portions. The rest can be resealed and put back into the freezer for future use.
Expand your recipe arsenal with meal kits.

If you're tired of the same old recipes or simply don't have the time to scour cooking blogs for inspiration, meal kits can be an excellent solution. With a meal kit, you'll receive all the ingredients you need to prepare delicious, restaurant-quality meals at home without the hassle of grocery shopping or measuring ingredients.
The beauty of meal kits is that there is a service to suit nearly every dietary preference and skill level (whether you're a seasoned cook or a newbie in the kitchen).
Some meal kit services, like HelloFresh, provide pre-portioned ingredients and recipe cards with easy-to-follow instructions. Others, like Gobble, go the extra mile by doing the prep work for you, such as chopping vegetables or marinating meats.
Aside from saving time and simplifying meal planning, I've personally found that meal kits can also be a great way to experiment with new flavors and cuisines. With a wide variety of recipes to choose from, you can expand your cooking skills and impress your friends and family with your culinary prowess. Plus, since the ingredients are pre-measured, you'll waste less food, which is better for your wallet and the planet.
Get creative to save time and effort on prep work.
You don’t have to spend a fortune on fancy kitchen gadgets in order to be a good chef. In fact, you can do more with the basics than you may realize—all you need is a little creativity.
Here are a few of my favorite ways to be creative with kitchen utensils I already have...
- Don't limit your apple slicer to just slicing apples. You can also use it to make potato wedges or steak fries.
- If you have an egg slicer that's collecting dust, try using it to slice mushrooms or dice soft foods like hard boiled eggs and avocados by pressing them through a wire cooling rack.
- Repurpose a pair of metal tongs to get every last drop of juice from lemons and limes. Simply squeeze half a lemon with the tongs to extract all the juice.
- Use reusable drinking straws to hull strawberries effortlessly
- Use your stand mixer to shred beef, pork, or chicken. We use our KitchenAid!
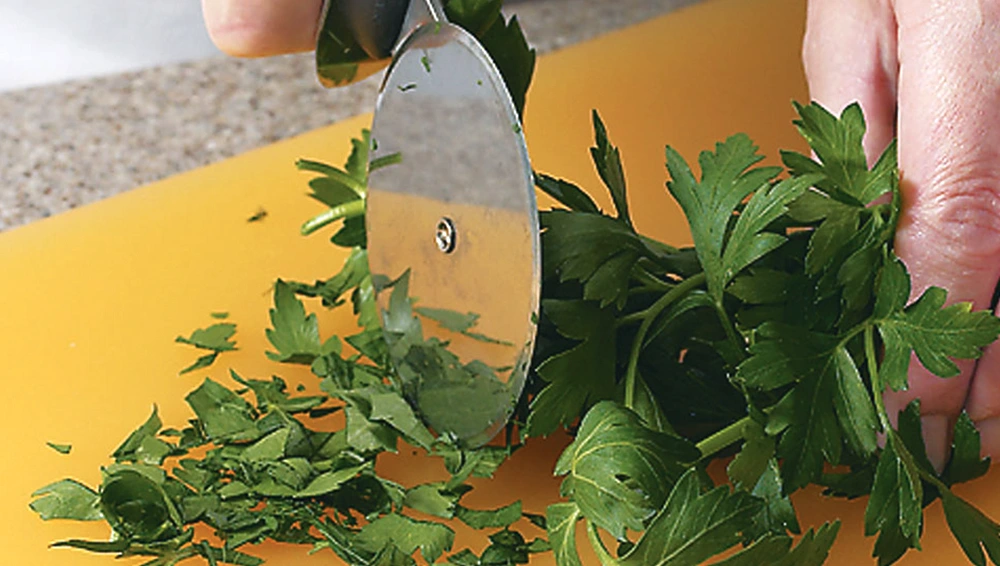
- Cut herbs and vegetables quickly using a pizza cutter for a perfectly chopped finish.
These clever hacks show that with a little creativity, you can make the most out of the utensils you already have in your kitchen, rather than shelling out more money for a kitchen gadget you might only use a few times. Not only can it save you time and money, but it can also help you create new and exciting dishes with ease.
Make your own simple substitutions.

Being creative with substitutions can be a game-changer in the kitchen. It not only saves you time and money, but it also allows you to improvise and create unique flavors.
For instance, instead of buying a carton of buttermilk for a single recipe, you can easily create a substitute by adding a teaspoon of white vinegar to a cup of regular milk. This substitute can be used in baking or even as a marinade for chicken or pork.
If you're halfway through a recipe and realize you're missing a crucial ingredient like a can of cream soup, don't panic. You can create your own version by blending butter, flour, milk, and chicken broth. Adding celery seed or diced mushrooms to the mixture can give you a cream of celery or cream of mushroom soup, respectively. The possibilities for flavor combinations are endless when you start experimenting with substitutions.
In addition to buttermilk and cream soup substitutions, there are many other common ingredient substitutions to keep in mind. For instance, you can substitute plain Greek yogurt for sour cream, applesauce for oil in baking, and even mashed avocado for butter in some recipes.
Here is a great list of common ingredient substitutions.
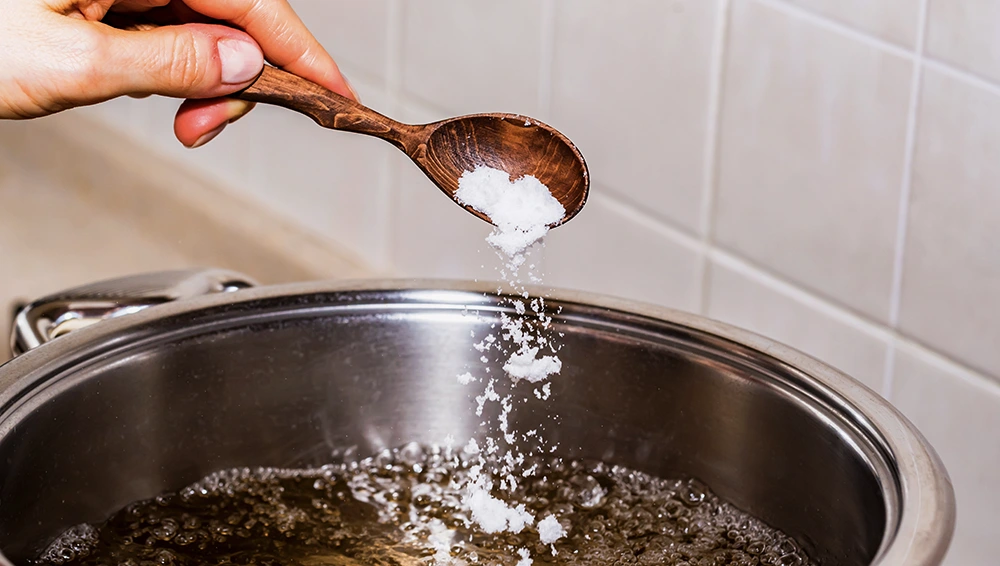
Soften brown sugar in the microwave.
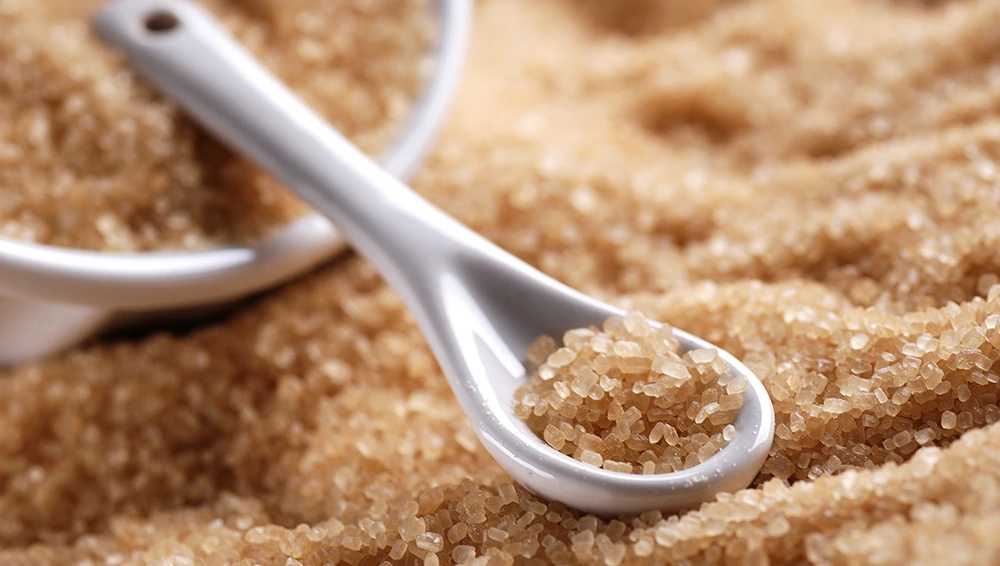
You may be familiar with the bread hack—putting a piece of bread in the bag with brown sugar to keep it soft. Brown sugar requires moisture to stay soft which is why proper storage is so important. Placing an open bag in a zippered plastic bag or tightly covered container can help, but adding a slice of bread will give the sugar something to draw moisture from.
If your brown sugar has already hardened, however, there’s a simple way to soften it. Just place the required amount of brown sugar in a microwave-safe bowl and place it side-by-side with ¼ cup of water in another microwave-safe bowl. Heat in 30-second intervals until the sugar is softened, stirring occasionally to make sure it isn’t melting on the bottom.
Stop crying when chopping onions.
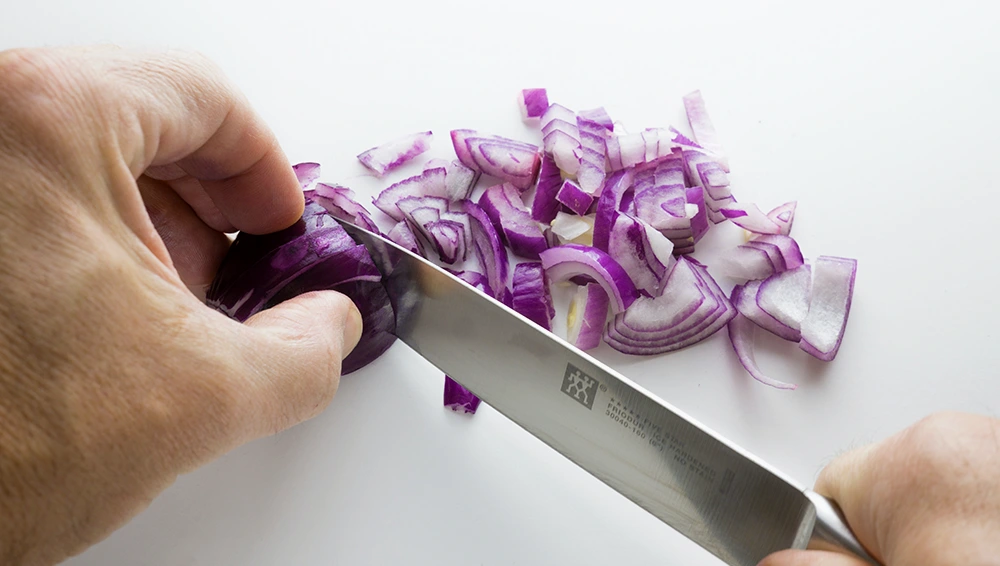
Cutting an onion releases an enzyme called alliinase which then break down the amino acids in the onion into various substances including a gas called syn-Propanethial S-oxide. This gas has an irritating effect on the membranes that protect your eyes which causes them to water. The trick to stop crying when chopping onions is to reduce that enzymatic activity.
If you don’t mind looking like a nerd in the kitchen, you can always throw on a pair of goggles to protect your eyes. However, another option is to simply keep your knives as sharp as possible. The sharper your knife, the less they will damage the onion’s cell walls which means they’ll release fewer enzymes.
I've found that chilling the onions for 30 minutes before cutting can help as well, though you don’t need to use your fridge for long-term onion storage. Your onions will last longest if you store them in a cool, dry, and dark space with plenty of ventilation. You’ll want to transfer them to the fridge, however, after they’ve been peeled, cut, or cooked.
Make perfect poached or hard boiled eggs.
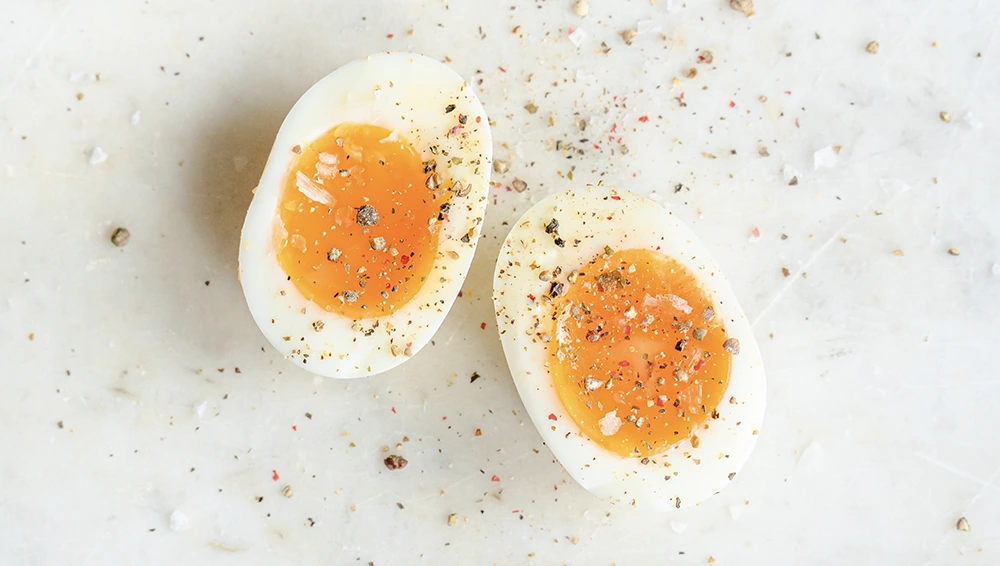
When it comes to breakfast, few meals beat a perfectly poached egg. However, achieving the ideal poached egg can be challenging and time-consuming, especially if you only need a single serving. But fear not, there's a hack for that!
To make a quick poached egg, you'll need a large egg straight from the refrigerator, 1/4 cup of water, salt, and pepper for serving. Begin by microwaving the water in an 8-ounce glass measuring cup or sturdy microwave-safe mug for 1 minute on high power. Crack the egg into the water and gently slide a toothpick into the yolk to keep it intact. Cover the measuring cup or mug with plastic wrap or a small microwave-safe saucer.
Microwave the egg for another 35 seconds on high power, though the exact cook time will depend on the wattage of your microwave. Use a spoon or fork to gently lift the egg out of the mug and set it on a slice of stale bread or a paper towel. Transfer it to your serving plate, sprinkle with salt and pepper, and enjoy!
It's important to note that older eggs with runny whites don't poach well, so use fresh eggs for best results. If your carton of eggs has been in the fridge for more than a week, try making an omelette in a mug instead. And to prevent the yolk from exploding in the microwave, pierce it with a toothpick and cover the mug with plastic wrap or a saucer.
While poaching an egg in the microwave is a game-changer, making a hard-boiled egg requires a bit more effort. But the good news is that there's a trick to make the process easier and less time-consuming.
When boiling eggs, add a 1/4 teaspoon of baking soda to the water. This helps to raise the pH level of the water and makes it easier to peel the egg. As a result, the shell comes away in larger pieces, saving you time and leaving you with a cleaner result.
Another helpful tip for making hard-boiled eggs is to use an Instant Pot. Simply add the eggs to the pot and set it to the "steam" function. The result is perfectly cooked hard-boiled eggs that are easy to peel and ready in just a few minutes.
Reduce cooking mess using parchment paper.
Parchment paper is a staple in any baker's kitchen, but it can be used for so much more than just lining baking pans.
Here are a few creative ways to use parchment paper in your cooking...
- Seal in flavor by cooking fish in a parchment paper packet with fresh herbs and sliced citrus. This cooking method is not only easy, but it also keeps your fish moist and flavorful.
- For a unique breakfast hack, cook fried eggs directly on your stovetop (electric stoves only!) by cracking an egg onto a piece of parchment paper. Cook to your desired level and enjoy a hassle-free, no cleanup breakfast.
- Line baking pans and casserole dishes with parchment paper to prevent food from sticking and make cleanup a breeze. To do this, simply cut a piece of parchment to the appropriate size and shape, fold it in half from top to bottom, then again from left to right. Make a diagonal cut from the bottom right corner toward the center, then unfold and press it into the dish.
By using parchment paper in these creative ways, you'll not only save time and effort in the kitchen but also elevate your cooking game. So, the next time you reach for that roll of parchment paper, remember that it can do so much more than just line your baking pans.
Weigh ingredients instead of measuring them.
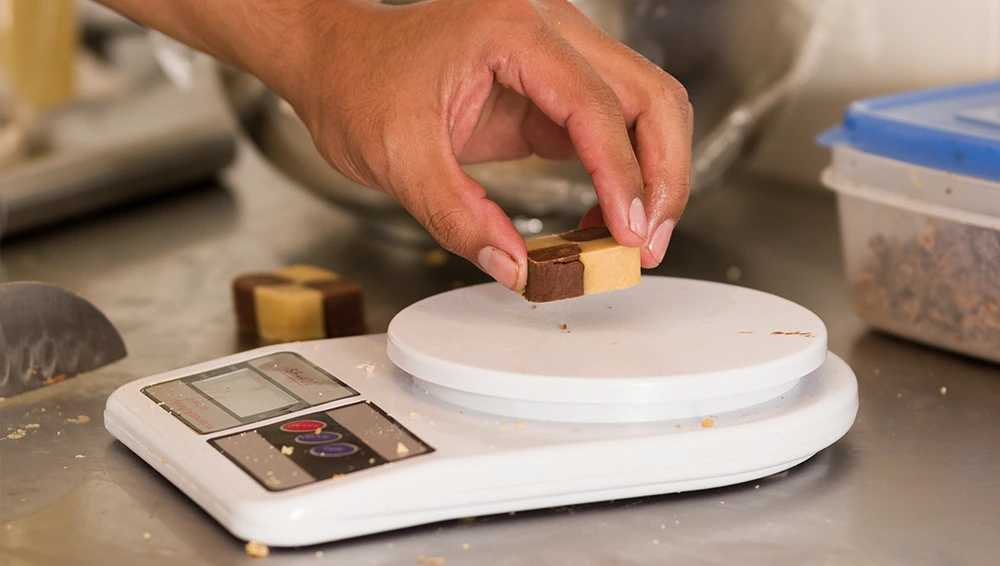
Following a recipe helps reduce some of the guesswork involved in cooking and baking but it also tends to create more mess. If you find yourself measuring out numerous dry and wet ingredients, you’ll also find yourself with a sink full of dishes to wash.
One of the simplest solutions is to start weighing ingredients by weight using a digital scale so you can add them directly to your mixing bowl. This is the one I use because it's waterproof and washable but there are many cheaper options available.
It’s best to start with a recipe that lists ingredients by weight but you can sometimes get away with doing the conversion yourself. Try this cup-to-gram conversion chart or download an app to use on your phone or tablet.
Learn how to fix common cooking mistakes.
Cooking mistakes are bound to happen, but there's no need to start over or throw out the dish. With a few simple tricks, you can fix common cooking mistakes and salvage your meal.
If you've added too much salt to a soup or sauce, don't panic. Try adding a few slices of apple or potato to the dish and let it simmer for 10 minutes. The slices will absorb some of the excess salt, allowing you to adjust the seasoning without starting over.
Similarly, if your dish is too spicy, you can mellow out the heat by serving it over a neutral, absorbent food like pasta or rice. Another option is to add dairy products like butter, milk, or yogurt. The protein casein found in dairy binds to the capsaicin molecules that cause spiciness, effectively reducing the heat.
On the other hand, if your dish is too sweet, a little bit of heat can help balance out the flavors. Adding a touch of spice can create a more complex flavor profile and cut through the sweetness. Conversely, if your dish is too bitter, sweeteners like honey or maple syrup can help round out the flavor and make it more palatable.
Remember, cooking is all about trial and error, and mistakes are inevitable. With these simple hacks, you can fix common cooking mistakes and create delicious, perfectly balanced meals every time.
Put your cooling rack to work.
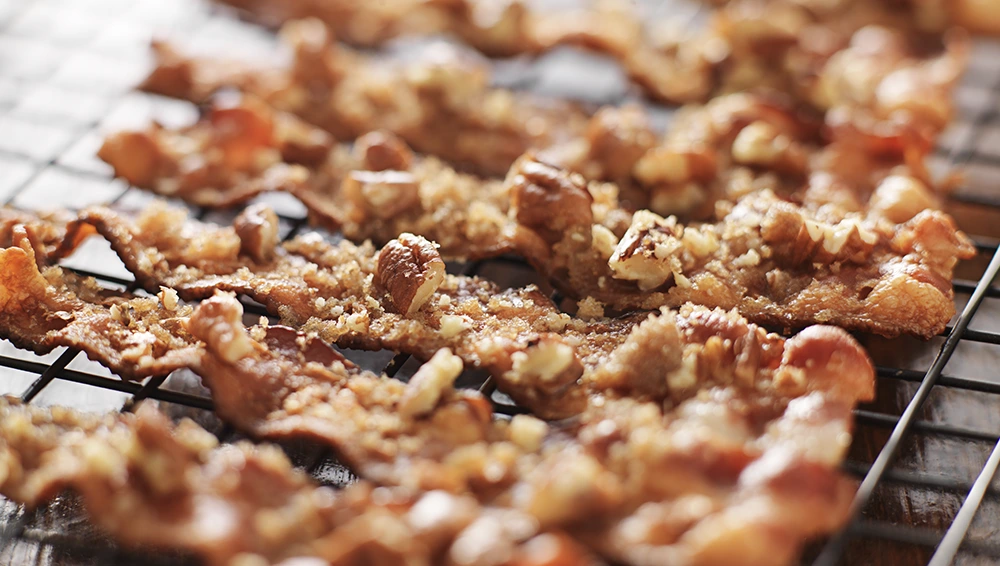
Cooling racks are a versatile tool in any cook's kitchen, and they can be used for more than just cooling down baked goods. In fact, there are several ways you can use a cooling rack during the cooking process to create healthier, crispier dishes.
One of the best ways to repurpose a cooling rack is to use it to reduce the fat content of your food, especially meat-based dishes. Instead of cooking meatballs or bacon directly on a baking tray, try setting a cooling rack over the tray before placing the meat on top. As the meat cooks, the fat will drip through the cooling rack and collect in the tray below, resulting in a leaner, healthier dish with less grease. You'll just want to make sure that your cooling rack is oven-safe. If you're not sure, do not use it in the oven because it can be toxic. This is the one I use specifically for the oven.
In addition to reducing fat, cooling racks can also be used to make your baked foods even crispier. Oven-baked versions of fried favorites like chicken tenders or breaded fish can sometimes fall short when it comes to achieving the perfect crunch. However, by baking breaded foods on a cooling rack set over a baking tray, the air can circulate around the food more easily, resulting in an evenly cooked, perfectly crisp dish.
The next time you reach for your cooling rack, remember that it can do so much more than just cool down your baked goods. By using cooling racks in these creative ways, you'll not only be able to create healthier, less greasy dishes, but also achieve that coveted crispy texture that makes your favorite foods so irresistible.
Revitalize wilted herbs and greens.
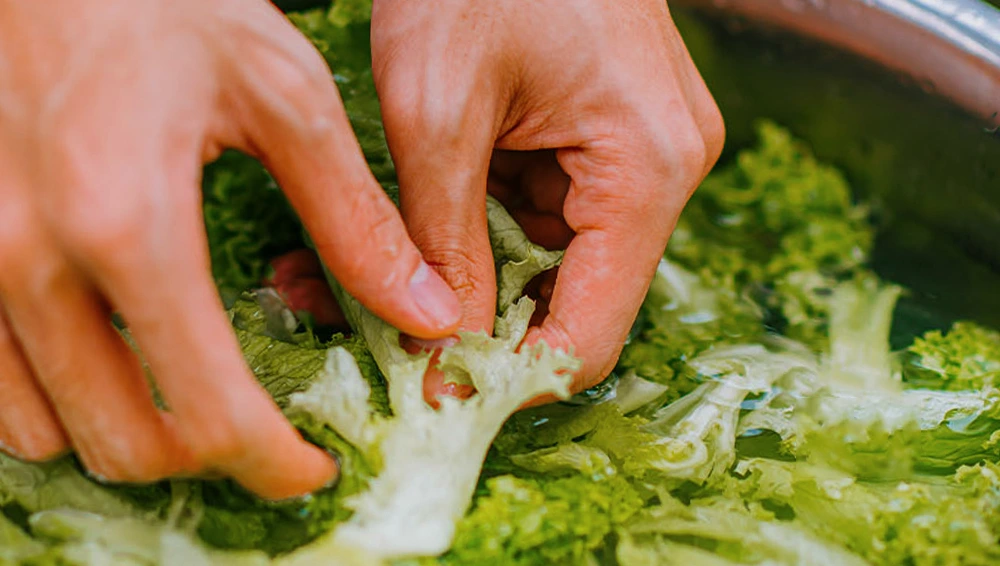
We all know the feeling of excitement when we stock our fridge with fresh produce, only to be disappointed when it looks wilted and unappetizing a day or two later. The good news is that you can easily revive limp herbs and greens with a simple trick—cold water! This cold water trick works by "shocking" them back to life.
For fresh herbs, try placing them in a glass of cold water in the fridge. This will keep them hydrated and help to revive them if they start to wilt. To keep them even fresher, cover the herbs with a plastic bag and secure the bottom around the glass with butcher's string or a rubber band. This will help to create a humid environment that will keep your herbs looking and tasting their best for longer.
Similarly, fresh greens can also benefit from an ice bath. Simply soak the greens in a bowl of ice water for a few minutes until they start to perk up. This will help to hydrate the leaves and restore their crispness.
By using these simple hacks to revive your produce, you'll be able to enjoy your fresh ingredients for longer as well as reduce food waste. Plus, there's nothing quite like the taste of bright, fresh herbs and greens in your favorite dishes.
Heat your knife to achieve perfect plating.
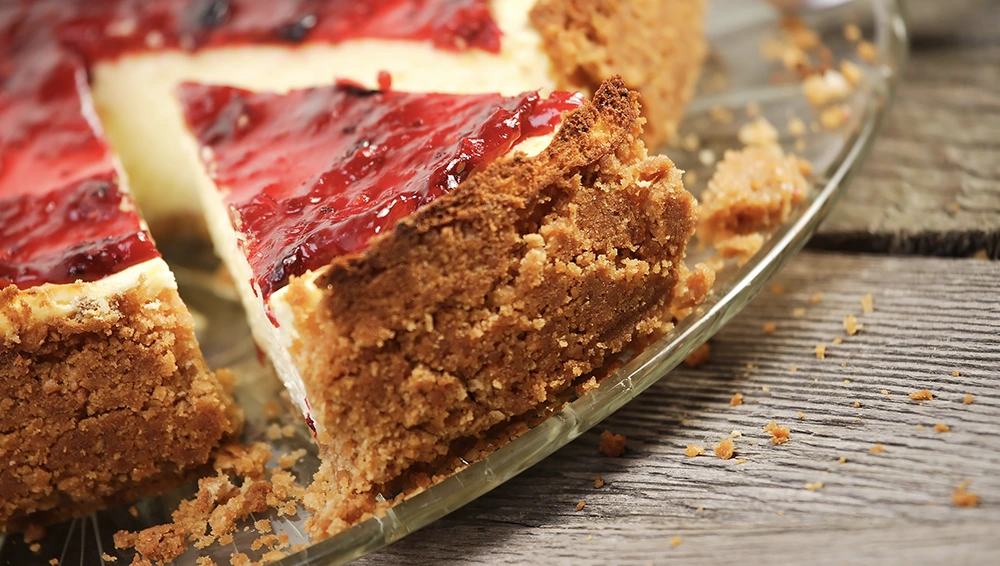
We all know the frustration of cutting into a beautiful cake or cheesecake only to have it crumble and fall apart on the plate. But fear not, there's a simple trick that can help you achieve a perfect slice every time: heat your knife.
Before slicing into your dessert masterpiece, run your knife under hot water for a few seconds, then dry it with a towel. This will heat the blade and help it slice through the dessert smoothly, without causing it to crumble or stick to the blade. For larger cakes or cheesecakes, you may need to repeat this process between each slice to ensure clean, beautiful cuts.
Not only will this trick help you achieve a perfect slice, but it will also make your dessert look as good on the plate as it did when it came out of the oven. No more messy, crumbled slices - just perfectly cut, beautiful desserts that are sure to impress your guests.
Final Thoughts
Cooking can be a rewarding and enjoyable experience with a little creativity and some helpful hacks.
It may not be wise to take every shortcut in the book but injecting a little creativity during the prepping process can help you save time, reduce effort, and minimize cleanup.
From repurposing kitchen tools to fixing common cooking mistakes, these simple tips and tricks can make a big difference in the kitchen. By implementing these cooking hacks, you can save time, reduce effort, and minimize cleanup while still producing delicious, satisfying meals. So, whether you're a beginner cook or a seasoned pro, give these hacks a try and see how they can transform your cooking routine.
Have a cooking hack I didn't mention in this article? Let me know in the comments!


